
Growing cannabis indoors is becoming increasingly popular as it allows for complete environmental control, potentially leading to higher quality yields. Here’s a step-by-step guide on how to set up an indoor cannabis grow operation, along with visuals to guide you through the process.

Step 1: Choose Your Space
The first step in setting up an indoor cannabis grow is selecting an appropriate space. This could be a small room, a closet, or a grow tent. The area should be able to be sealed to control light and air flow. Ensure it is clean and free of pests or mold.Step 2: Lighting
Cannabis requires specific light cycles to grow and flower. You’ll need to invest in quality grow lights—LEDs or HIDs (High-Intensity Discharge lamps) are popular choices. Install your lights ensuring they can be adjusted to maintain the optimal distance from the plants as they grow.Step 3: Air Circulation
Proper ventilation is crucial to prevent mold and mildew and to keep air circulating for your plants’ health. Install an exhaust fan at the top of the room to remove warm air and an oscillating fan to help strengthen plant stems by mimicking wind.Step 4: Climate Control
Cannabis plants thrive in specific temperature and humidity ranges. Typically, temperatures should be between 70-85°F (21-29°C) when the lights are on and slightly cooler when they are off. Humidity should be controlled depending on the stage of growth—higher for germination and lower during flowering.Step 5: Growing Medium
Choose a growing medium that suits your setup. Soil is the easiest to manage and is forgiving with nutrients, but hydroponic systems can be more efficient and yield more potent results. Hydroponic systems deliver nutrients directly to the plant roots via water.Step 6: Choose Your Cannabis Strain
Select a strain that fits your growing conditions and personal preferences. Consider factors such as size (some strains grow taller and wider), flowering time, and whether the strain is more suited to beginners or experienced growers.Step 7: Planting
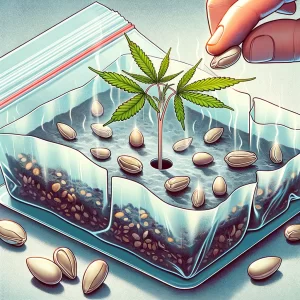
Start your plants from seeds or clones. Germinate seeds using a moist paper towel and plastic bag method or plant them directly into your chosen medium. If using clones, ensure they are healthy and free from pests.Step 8: Watering and Nutrients
Cannabis plants require regular watering and a well-balanced nutrient mix. Over or under-watering is common, so monitor the soil’s moisture level closely. Start with a mild nutrient mix and increase concentration as your plants grow.Step 9: Monitoring and Adjusting
Regularly check your plants for signs of stress, pests, and disease. Adjust light, water, nutrients, and climate settings as needed to maintain optimal growing conditions.Step 10: Harvesting
Once your plants have flowered and the trichomes (the tiny crystals on the leaves and buds) appear milky white or amber, it’s time to harvest. Cut the plants, trim away extra foliage, and hang them to dry in a controlled, ventilated space.Visual Aids
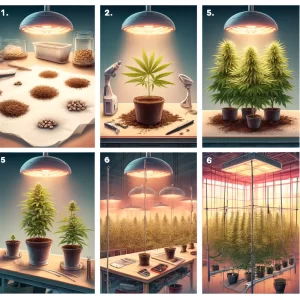
Let’s visualize some of these steps for a clearer understanding:- Setup of Indoor Grow Space: An illustration of a well-organized grow room with lights, fans, and plants in pots.
- Lighting and Climate Control Systems: A detailed setup showing placement of lights and ventilation in the grow space.
- Seed Germination and Planting: Step-by-step visuals from germination to planting in the grow medium.
Add a Comment